


Yoga has now been known for centuries, and numerous studies have shown that its regular practice can significantly improve physical, mental and spiritual health, while giving more flexibility, fitness, balance, muscle strength and mobility. Do you remember when you decided to do more yoga? You sat at the back of the classroom while the teacher said ridiculous things like “stretch your spine”. You then wondered what you were doing there.
If yoga allows you to relax in particular, it also acts directly on the body. By relying on deep breathing exercises and precise flexibility, yoga allows for example to refine targeted areas. Praised for its relaxing virtues, yoga is based on deep breathing work and on relaxing the body thanks to postures that can be repeated several times in a row.
Some recommendations before starting: Throughout the session, remember to contract your perineum and press your navel against the spine. The goal is to protect the lower back and increase muscle benefits.
Table of Contents
15 yoga poses that will transform your body
Are you taking up yoga, but not sure where to start? Taking lessons is more convenient for you, but you also want to practice at home. We helps you start your vocation as a yogi at home! Here are some explanations of the main yoga positions or postures (there are several hundred) to practice at home, on a daily basis.
The dog looking down
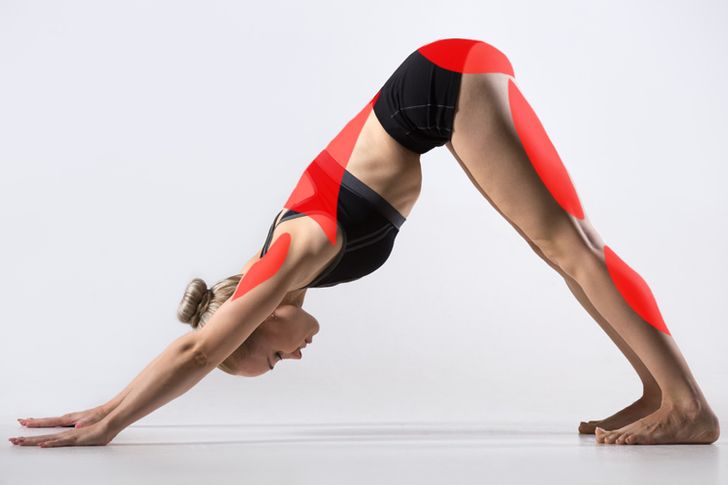
This posture stretches and strengthens the entire body, and is found in the main types of yoga. Let your body rest on all four ends. Place your wrists under your shoulders, and your knees under your hips. Tuck in your toes, lean on your hands and straighten your buttocks so that your bust tingles down. If necessary, bend your knees slightly, then hold this position for about five breaths.
The board

While this is one of the best exercises for strengthening your abs, it also works the rest of the body. The trick is to control your breathing well. There are many types of exercises based on the plank position, it’s up to you to choose which one works best for you. Your shoulders should be directly above your elbows, and you should keep your back straight, horizontal. If you can, lift your legs one after the other, if not, stay on your knees. Regardless, it is essential to always form a straight line from the top of the head to the hips, or to the tips of the feet.
Reverse plank

This is a great pose for stretching your upper body, and increasing the strength of your arms, legs, and core. In addition, this will improve your balance. Start by placing your hands behind you, and look at your feet. Lift your hips off the floor, stretch one leg, then the other, fingers resting on the floor.
Extended side angle

This pose is designed to work the sides of your waist, strengthen your legs, stretch your hips, hamstrings, calves, shoulders, torso and spine. It also opens up the lungs, improves digestion, and helps relieve stress. Start by spreading your legs and extending your arms. Turn your right foot 90º outward. Then slide your left foot back, bending your right knee, and bringing your hands forward. Gently bend down and place your right hand on your right ankle, shin, knee, or on the floor (depending on your flexibility), while extending the other hand to the sky, forming a straight line. Then repeat the exercise on the other side.
Shaft position

If you are new to the world of yoga, practicing this pose is a good place to start. It will improve your balance and teach you to breathe properly. It will also allow you to strengthen and tone the muscles in your legs, ankles and inner thighs. Start by joining your feet together. Then slowly lift your left knee, touch it, put your left foot on your thigh or calf level (making sure to avoid the knee area) then lift your hands up, palms together. Hold this position for 8-10 breaths, then switch legs.
Warrior stance 1

This posture is also one of the main poses found in many types of yoga. It is essential for improving the strength of your abs and the lower part of your body. It is also ideal for stretching your hips and thighs. Take a big step back with your right foot, and place your left foot flat on the mat. Bring your shoulders back and pump your chest out. Then raise your arms, keeping the palms of your hands together. Hold this position for 8-10 breaths, then switch sides.
Warrior stance 2

Here is another very important position, because it will stretch your hips and the inner part of your thighs. In addition, it will improve your balance, facilitate your digestion, maintain mental health, and relieve your back pain. Remain standing, legs apart. Turn your left foot 90º and your right foot 45º. Bend the front knee and extend your arms sideways. Look over your right hand, hold this position for 8 or 10 breaths, then repeat the exercise on the other side.
Sitting position, leaning forward

This pose is very useful for stretching the lower and upper part of your back, as well as your hamstrings, as it opens the whole body, and thus teaches you to breathe well, even in an uncomfortable position. It will also relieve you of headaches and reduce your fatigue. Start by sitting down with your legs together, and then lean your body forward, so that your chest is resting on your legs. Once you reach your maximum stretch, breathe 8-10 times. Make sure you keep your back straight!
Bridge position

This is another important position for beginners because it works by stretching the front of the body, while strengthening the back. It also improves blood circulation and digestion, relieves stress, opens the lungs, and helps the thyroid gland function properly. Lie on your back, keeping your feet close to your hips. Then lift the pelvis and hold the position for 8-10 breaths.
Position of the fetus

It is the best resting position for relieving stress or tension, and it is also very good for digestion. Start by kneeling on a mat, then lower your head to the floor, placing your hands forward, to the side or back, and relax!
Position of the cobra

This position is excellent for strengthening your back, and relaxing your chest and shoulders. It will also reduce the stiffness of the lower part of your body. Start by doing the dog pose (first on the list), then move on to the plank position. Then bend your elbows and slowly lower your pelvis to the floor. Shift your shoulders back and gently arch your back. Hold this position for 8-10 breaths.
Arc position

This pose will stretch the entire front of your body, strengthen your back, and improve posture and flexibility in your spine. Lie on your stomach, bend your knees, lift your thighs, hollow your back, and grab your ankles with your hands. Hold this position for 8-10 breaths.
Boat position

This position will help relieve stress, improve digestion, stimulate your kidneys, thyroid and bowels, and strengthen your thighs and lower back. Start by sitting on your butt, bend your knees, lean back and lift your feet until your shins are parallel to the floor. If you feel comfortable in this position, straighten your shoulders, stretch your arms forward, grab your knees and raise your legs so that your body forms a V. Hold this position for 8-10 breaths.
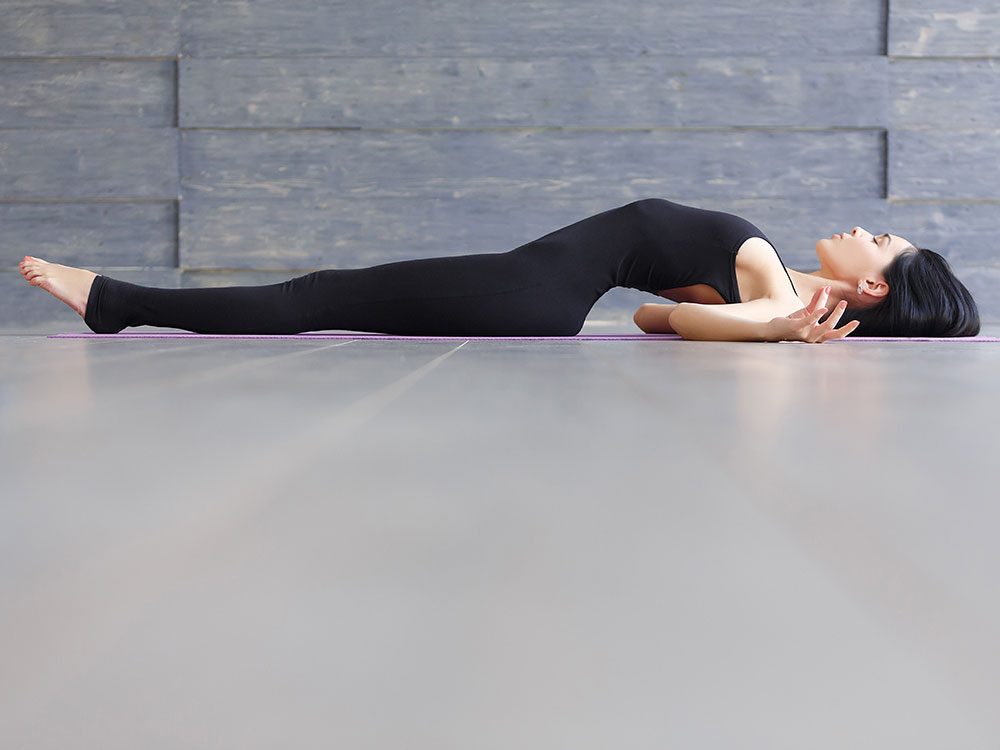
Position of the fish

This position will strengthen your hamstrings and lower back, and it will also open up your hips and rib cage. Start by lying on your back, keeping your feet on the ground and your legs straight. Lift your upper body by sliding your hands under your buttocks. Keep your forearms and elbows at your side, and lift your upper back.
Position of the wind blast

This posture will help you release toxic gases from your body. Lie on your back and bring your knees to your chest. Press down on the lower part of your abdomen while holding your knees with your hands. Then lift your head, neck and chest, bringing them closer to your knees. Hold this position for 8-10 breaths, then return to the starting position. So what do you think of these yoga positions? Do you know of any other simple ones that we could have added to this list? Leave a message in the comments, and don’t hesitate to share this article with those around you!
8 postures to relieve back pain
As we know, yoga helps ease tensions and relax. But it also helps relieve back pain. Particularly suitable for strengthening the spine and relieving the lumbar zone, here are 8 postures to perform on a daily basis. Praised for its relaxing virtues, yoga is based on deep breathing work and on relaxing the body thanks to postures that can be repeated several times in a row.
The head down warrior pose

This very simple posture allows the spine to be completely lengthened. Place a blanket under your buttocks and a brick under each of your hands. The arms are outstretched, active, and the tailbone moves towards the heels. Be sure to keep your shoulders high for a better stretch.
The cat pose

The cat posture breaks down into two stages. It is excellent for the back because it relaxes the spine. It also strengthens the transverse, the deep muscle of the abdomen. On all fours, shoulders above the wrists, we dig the back then round it by sucking the navel. You can repeat this movement for more reinforcement.
The downward dog pose

The head down dog posture, legs slightly bent and heels raised allows the spine to lengthen by aligning the back of the skull and the sacrum. If possible, sit with your hand against a wall, heels up and knees bent, and try to keep the spine straight to stretch it.
Against a wall
This stretching posture, practiced against a wall, allows you to stretch and align the shoulders and pelvis. We position ourselves feet and hands at a right angle to the ground and the wall and we take care not to hollow the back.
The posture of the chair against the wall
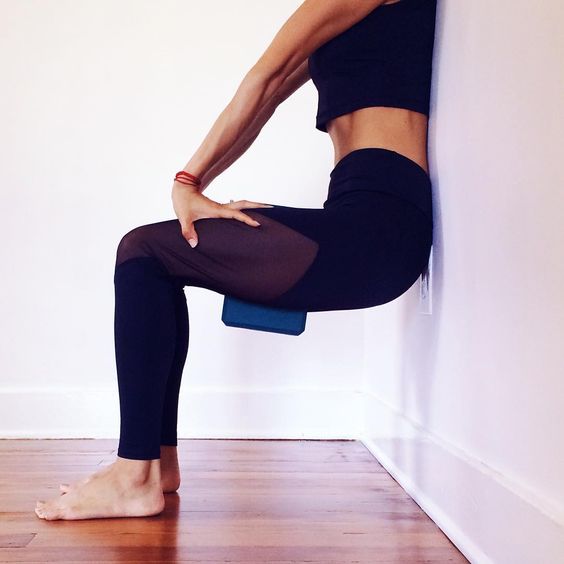
Calvary of the gym, the position of the chair against the wall is beneficial, in yoga, for back pain. We sit with our back straight against a wall, knees at 90 degrees. This posture strengthens the muscle column while respecting the postural alignment.
The camel pose

Usually, the camel posture is practiced vertically, here it is lengthened horizontally. It is very beneficial: it stretches the back, opens the rib cage while stretching the abdominals. Lying on the ground, a bolster under your back, you place your legs in a “suit” by opening the arms, in order to stretch the back and the abs.
The half-bridge posture

We practice this half-bridge posture by adding a brick, which we place under the pelvis. This pose is ideal for the back, as it strengthens the lumbar area and the rib cage, while also stretching the abdominals. Positioned on the shoulders, we lift the pelvis (here using the brick) by aligning the knees, pelvis and shoulders.
Pavanamuktasana pose

This posture with an unpronounceable name is very simple and allows you to stretch the entire spine, it is easily adopted daily, after a sport session or to relax. It is perfect to end a session. Lying on the ground, it is best to stand near a wall in order to support the foot of the extended leg on it to align the pelvis.
10 yoga positions to relieve anxiety
A yoga position can help relax the body and calm the mind. Asanas (positions), breathing and meditation help reduce stress levels, allow the body to recover and improve well-being. By refocusing attention on body movements, yoga effectively reduces the number of anxiety- inducing thoughts and calms the nervous system. In addition, by promoting listening and self-awareness, this practice helps to recognize earlier signs of stress and get rid of them.
Child position

Make sure you have a mat under your legs. Get down on your knees with your feet parallel. Your ankles should not point outward but rather tend inward. Inhale and, on the exhale, place your back sit bones (bones that support you in a sitting position, noticeable in the buttocks) on your heels. Your belly and chest rest along your thighs. Your arms are stretched out in front of you, hands extended and flat on the mat, palms down.
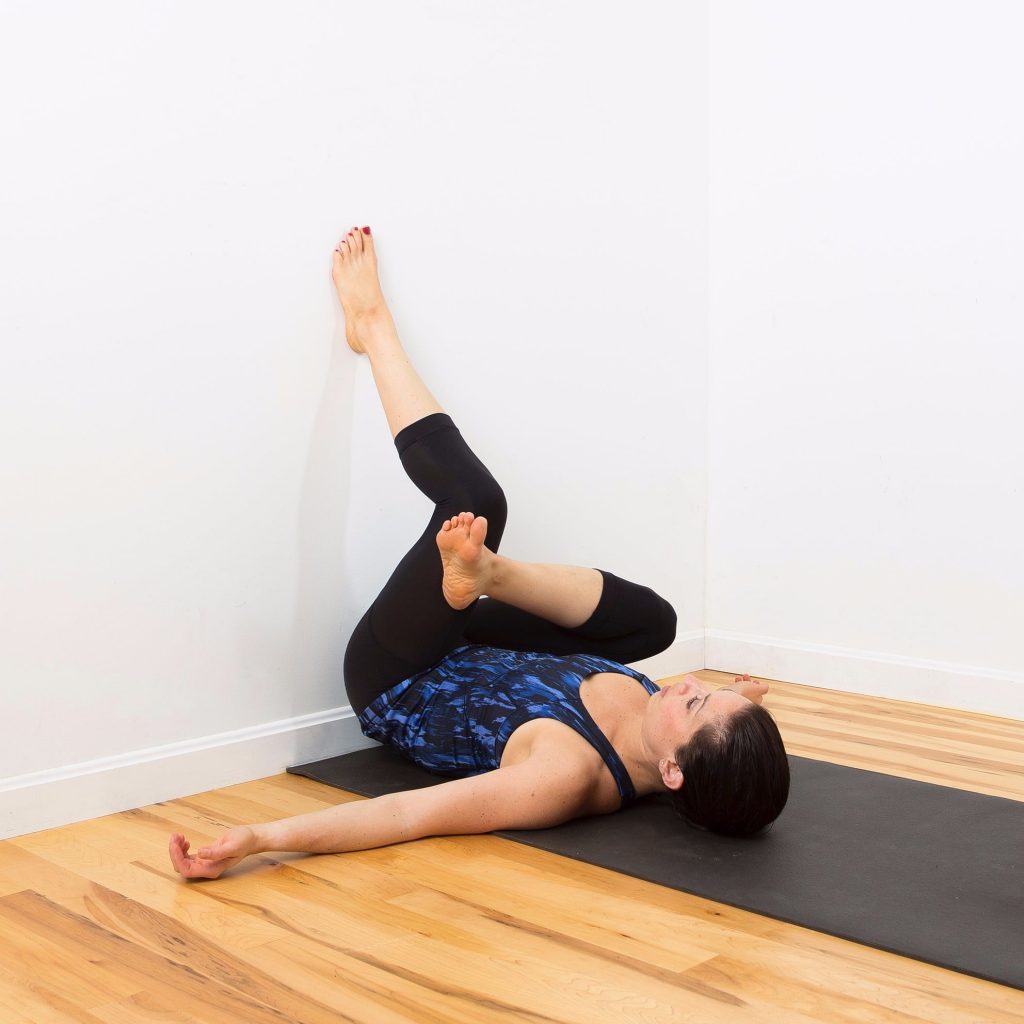
Supta padangusthasana position

Lying on your back, place both feet against the wall in front of you, feet hip-width apart. Make sure to keep the natural curve in your lower back and the back of your neck. Inhale as you push against the wall with the sole of your left foot. On the exhale, bend the right leg, place the strap around the heel and hold the strap with both hands. On the next exhale, slowly extend the right leg. Repeat on the other side.
Warrior stance I

Begin standing in the mountain pose (tadasana): back straight, feet hip-width apart, shoulders relaxed, arms at your sides. Make sure the soles of your feet are firmly on the floor, gently pressing their ends into the mat. Inhale and raise your arms straight above your head. Exhale and step back with the left foot at a 45 degree angle to your body, while stepping forward and bending the right leg so that it forms a right angle, knee above the ankle and feet parallel. Repeat on the other side.
Prasarita Padottasana position

Standing in a mountain position (tadasana), place both hands on the hips. Spread your legs, make sure the ankles are placed under the wrists, at the same distance. Press your feet firmly into the mat and straighten your legs. Inhale, lengthen your spine, and on the exhale, lean your upper body forward, head toward the floor. Place your forehead on a chair or on a block. Make sure the skin on your forehead is moving downward toward your nose. Hold the position and breathe deeply.
Stork position

Standing in a mountain position (tadasana), place both hands on the hips. The feet are hip-width apart. Pressing your feet firmly into the mat, straighten your legs. Inhale, lengthen the spine and, on the exhale, lean forward. Place your head on a chair or block. Make sure the skin on your forehead is moving downward toward your nose. Stay here and breathe.
Butterfly position

Sit on your mat or against a wall with your back straight, both legs stretched out on the floor in front of you. Be well seated on both sit bones. Exhale, bend your knees, bring your heels as close to your pelvis as possible, then drop your knees to your sides while pressing the two soles of your feet together.
Bishmasana position
Sit on your mat with your legs on the floor and straight out in front of you. Place two blocks behind you, flat and horizontal, so that one block is under your head and the other under your shoulder blades when you lie down. Place your hands next to you, on either side of your hips. Inhale, gently press into the mat with your hands and, on the exhale, lie backward on both blocks. Keep your legs active (straight, ankles flexed). Rest and breathe deeply here for a few minutes.
Half candle position

Close to a wall, sit on your side, so that it ends up on your right or left. Place your sit bones (the buttocks and back of the thighs) against the wall, using your hands as needed to get as close as possible. Exhale and place your legs against the wall, letting your shoulders and head rest gently on the floor. Bend your knees and press your soles against the wall. Lift your pelvis and slide a block below your sacrum. This position should allow you to rest: make sure that you are resting on the top of your shoulders and not putting weight on your shoulder blades or your neck.
Supta Matsyendrasana position

Lie on your back, arms outstretched to each side (perpendicular to the body), knees bent. As you exhale, move your pelvis to the left and drop your knees to the right. Gently turn your head away from your knees. If you need support for your knees, place a block or pillow underneath. Make sure your head is turned gently in the opposite direction. Rest and breathe deeply in this position.
Resting position

Lie on your back, arms at your sides and slightly apart, palms facing the sky. The legs are also apart, the feet relaxed, falling on each side outwards. Place a pillow or block under your head. Gently close your eyes, relax your face and rest.
A brief history of yoga

The history of Yoga dates back to the origin of the Indus Valley civilization in northwest India over 5,000 years ago. Yoga was first mentioned in the Rig-Veda, India’s oldest collection of spiritual texts, comprising a collection of chants, mantras and rites. Initially, Yoga was intended to promote a better understanding of the world. Subsequently, it evolved into a study of the self, self-fulfillment being the ultimate goal. The collection of Hindu texts called the Upanishad defines this path as: “study with a master and devote his life to the practice of Yoga.”
The 6th century BC: A turning point in the history of Yoga

It was around the sixth century BCE that postures and meditation became important elements of Yoga. In large part, these were implemented by the teachings of Buddha. One of the last important collections of Yoga is Patanjali’s book, the Yoga-Sutra. This lays the groundwork for Ashtanga Yoga or Yoga with eight branches. In 195 aphorisms or brief statement summarizing a theory or a knowledge, the Yoga-Sutras of Patanjali codified the teaching of a traditional practice several thousand years old. It is the very spirit of Yoga which is described in this book written in Sanskrit, the oldest of all our Indo-European languages. The word Sutra in this language designates the thread of the necklace and, by extension, the common thread of a reasoning or a presentation. It also evokes the pearls of the necklace and then refers to the 195 aphorisms which constitute the treatise. We then speak of Yoga-Sutras in the plural.
Yoga is internationalizing
Yoga was first introduced to cultured Westerners in the mid-19th century along with other aspects of Indian philosophy. In the 1890s, the famous yogi Swami Vivekananda toured Europe and the United States. Its popularity was supported by many intellectuals, including transcendentalists, among whom were Ralph Waldo Emerson and Henry David Thoreau, who had themselves been inspired by German Romanticism and the interest of philosophers such as Georg Hegel and Arthur Schopenhauer in the culture and ideologies of India. Theosophists also influenced the view and acceptance of Yoga in the United States. This movement embraces a host of mystical and occult philosophies.
Krishnamacharya or the “father” of modern Yoga

In the early twentieth century in India, many ancient customs continued to be shattered by the British and few Indians continued to practice Yoga. However, a young man, Tirumalai Krishnamacharya, had been in contact with Yoga during his childhood. When there was a renewed interest in Indian traditions during these formative years, he was able to study Hindu rites, Indian laws, Sanskrit and Ayurveda, traditional Indian medicine.
Nevertheless, it was to Yoga that he devoted himself primarily and it was he who more or less created what we consider to be the modern, more physical style of Yoga: Ashtanga Vinyasa Yoga. This was in part the result of the patronage of the Maharaja of Mysore. As a diabetic, he was interested in the potential healing virtues of the discipline. Krishnamacharya believed that Yoga should follow three stages. During youth, we develop muscle strength and flexibility. During our adult family years, we maintain our health. Ultimately at the end of our life we will focus on our spirituality. Krishnamacharya was also the first yogi to accept women among his students. He taught Indira Devi, The World’s First Female Yoga Teacher.


